Update
The update steps divided in the ones for the management server and the ones for the PLOSSYS 5 server.
Hint - no Internet access
If the server on which you want to update the components does not have Internet access, use another server with Internet access for logging on to the SEAL Systems delivery platform and downloading the folder and packages. Then, copy the downloaded files to the server on which you want to update.
Notes Concerning the Update from 5.0.5 to 5.1.0
-
With PLOSSYS 5.1.0, the directory structure of the installation has been changed. Therefore, it is required to execute some manually steps before and after the update, refer to Manually Steps Before Updating the PLOSSYS 5 Server from 5.0.5 to 5.1.0 and Manually Steps After Updating the PLOSSYS 5 Server from 5.0.5 to 5.1.0.
-
When updating to PLOSSYS 5.1.0 and using easyPRIMA as of version 1.3.1, the
20181204_perl_soap-lite_1.27_part.zippackage has to be installed with easyPRIMA. Otherwise, the export from easyPRIMA to PLOSSYS 5 does not work and the500 SSL negotiation failederror message is output to the logfile of easyPRIMA (edc.log).Hint - stop the system
Before installing the
20181204_perl_soap-lite_1.27_part.zippackage, stop the system and all Perl processes completely (sysstop -full). Otherwise, the Perl environment will break. -
Up to version 5.0.5, an error sheet was output in case of error. As of version 5.1.0, the error sheet is not output by default but can be activated by setting
PRINT_ERROR_SHEETtoY. ThePRINT_ERROR_SHEETenvironment variable is available as of version 5.1.0.
Notes Concerning the Update from 5.1.0 to 5.2.1
The Consul service has been replaced by a newer incompatible version. Therefore, the system configuration has to be exported before the update and imported again after the update, refer to Manually Steps Before Updating the PLOSSYS 5 Server from 5.1.0 to 5.2.1 and Manually Steps After Updating the PLOSSYS 5 Server from 5.1.0 to 5.2.1.
In MongoDB, a shared replica set has to be configured, refer to Configure MongoDB in a Cluster for the cluster mode or Configure a Shared Replica Set and Initialize the Database (Only for Single Server Mode) for the single server mode.
Some services have been replaced by other services or have become obsolete and have to be removed manually after updating, refer to Manually Steps After Updating the PLOSSYS 5 Server from 5.1.0 to 5.2.1.
Update the Management Server
Caution - SEAL Elastic Stack incompatible to seal-elk
SEAL Elastic Stack contains the new version of Elasticsearch and Kibana and replaces seal-elk. Before installing SEAL Elastic Stack, you have to uninstall seal-elk!
-
In a browser, log on to the SEAL Systems delivery platform with your logon data:
https://delivery.sealsystems.de
Hint - logon data
You receive the logon data from your Technical Project Manager at SEAL Systems.
-
Download the SEAL Elastic Stack - 1.0.2.9 - msi folder. It is saved as
SEAL Elastic Stack - 1.0.2.9 - msi.zip. -
Extract
SEAL Elastic Stack - 1.0.2.9 - msi.zip. -
Open a Command Prompt (Administrator), change into the
SEAL Elastic Stack - 1.0.2.9 - msi\serverdirectory and install the server-related packages contained there:cd "SEAL Elastic Stack - 1.0.2.9 - msi\server"install.bat -
Download seal-bos2gyros-1.0.39.42.msi.
-
Install
seal-bos2gyros-1.0.39.42.msi. -
For updating easyPRIMA, refer to the easyPRIMA documentation.
Manually Steps Before Updating the PLOSSYS 5 Server from 5.0.5 to 5.1.0
With PLOSSYS 5.1.0, the directory structure of the installation has been changed. Therefore, it is required to execute some manually steps before and after the update.
-
Open a Command Prompt (Administrator) and stop the PLOSSYS 5 system completely:
plossys service stop -
In the Command Prompt (Administrator), copy the following directories to the new locations:
robocopy "%ProgramData%\SEAL Systems\plossys\config" "%ProgramData%\SEAL Systems\config" * /e /b /copyall /fp /ns /nc /np /nfl /ndlrobocopy "%ProgramData%\SEAL Systems\plossys\data" "%ProgramData%\SEAL Systems\data" * /e /b /copyall /fp /ns /nc /np /nfl /ndlCaution - access rights
Do not copy the directories via Windows Explorer. Use the
robocopycommand in the Command Prompt (Administrator) in order to retain the correct access rights. -
In the Command Prompt (Administrator), save the following configuration files:
rename "%ProgramData%\SEAL Systems\config\mongod.conf" mongod.conf.bak 2>NULrename "%ProgramData%\SEAL Systems\config\consul.json" consul.json.bak 2>NULrename "%ProgramData%\SEAL Systems\config\filebeat.yml" filebeat.yml.bak 2>NUL -
When using MongoDB in a cluster, you have to update MongoDB as described in the MongoDB documentation:
-
Upgrade all secondary members of the replica set one by one.
-
Step down the primary server by connecting to the mongo shell and calling:
rs.stepDown() -
Upgrade the primary member of the replica set.
-
Enable the backwards-incompatible 3.6 features by connecting to the mongo shell and calling:
db.adminCommand( { setFeatureCompatibilityVersion: "3.6" } )
-
Manually Steps Before Updating the PLOSSYS 5 Server from 5.1.0 to 5.2.1
With PLOSSYS 5.1.0, the Consul service has been replaced by a newer incompatible version. Therefore, the system configuration has to be exported before the update and imported again after the update.
-
Save the system configuration:
plossys config export <config_save_filename> -
Remove the Consul data directory:
C:\ProgramData\SEAL Systems\data\seal-consul
Update the PLOSSYS 5 Server
-
In a browser, log on to the SEAL Systems delivery platform with your logon data:
https://delivery.sealsystems.de
Hint - logon data
You receive the logon data from your Technical Project Manager at SEAL Systems.
-
Download the PLOSSYS 5 - 5.3.0.348 - msi folder. It is saved as
PLOSSYS 5 - 5.3.0.348 - msi.zip. -
Extract the
PLOSSYS 5 - 5.3.0.348 - msi.zipfile. -
Open a Command Prompt (Administrator), change to the
PLOSSYS 5 - 5.3.0.348 - msidirectory and start the installation of the packages:cd "PLOSSYS 5 - 5.3.0.348 - msi"install.bat -
Download the SEAL Elastic Stack - 1.0.2.9 - msi folder. It is saved as
SEAL Elastic Stack - 1.0.2.9 - msi.zip. -
Extract
SEAL Elastic Stack - 1.0.2.9 - msi.zip. -
In the Command Prompt (Administrator), change to the
SEAL Elastic Stack - 1.0.2.9 - msi\clientdirectory and start the installation of the client-related packages:cd "SEAL Elastic Stack - 1.0.2.9 - msi\client"install.bat
Manually Steps After Updating the PLOSSYS 5 Server from 5.0.5 to 5.1.0
With PLOSSYS 5.1.0, the directory structure of the installation has been changed. Therefore, it is required to execute some manually steps before and after the update.
-
Open a Command Prompt (Administrator) and stop the PLOSSYS 5 system completely:
plossys service stop -
In the Command Prompt (Administrator), adjust the following new configuration files according to the settings in the configuration files saved with the
.bakextension before the update:%ProgramData%\SEAL Systems\config\mongod.conf%ProgramData%\SEAL Systems\config\consul.json%ProgramData%\SEAL Systems\config\filebeat.yml
-
When running PLOSSYS 5 in a cluster, edit
%ProgramData%\SEAL Systems\config\mongod.confand insert the following line into thenetsection:bindIp: 0.0.0.0 -
In the Command Prompt (Administrator), remove the configuration files saved with the
.bakextension before the update and the previous installation directory:del /S /Q "%ProgramData%\SEAL Systems\config\mongod.conf.bak"del /S /Q "%ProgramData%\SEAL Systems\config\consul.json.bak"del /S /Q "%ProgramData%\SEAL Systems\config\filebeat.yml.bak"rmdir "%ProgramData%\SEAL Systems\PLOSSYS" -
In the Command Prompt (Administrator), start the PLOSSYS 5 system:
plossys service start
Manually Steps After Updating the PLOSSYS 5 Server from 5.1.0 to 5.2.1
With PLOSSYS 5.2.1, the Consul service has been replaced by a newer incompatible version. The system configuration exported before updating has to be re-imported.
-
Import the exported system configuration:
plossys config import <config_save_filename>
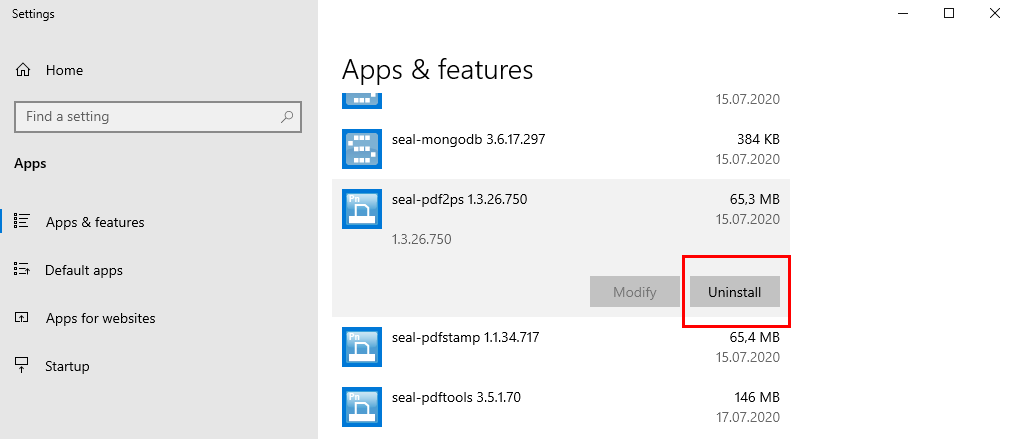
With PLOSSYS 5.2.1, the following services have been replaced by other services or have become obsolete and have to be removed manually after updating:
seal-pdf2psseal-pdfstampseal-ps2pdfseal-routerseal-sapgof
Open the Apps & Features system dialog and uninstall the services listed above one by one by selecting the service and clicking Uninstall:
Manually Steps After Updating the PLOSSYS 5 Server from 5.2.1 to 5.3.0
With PLOSSYS 5.3.0, the seal-controller service has been introduced which will replace the seal-dispatcher service in the next version. By default, the seal-dispatcher service is still used but you can already activate the seal-controller service by setting JOB_DISPATCHING to next.
When using the seal-controller service and if you have customized the service keys for seal-dispatcher in your PLOSSYS 5 installation before, you have to repeat the customization for seal-controller after the update:
-
If you have customized
JOB_MAX_POSTPONED_COUNTforseal-dispatcher, set the same value withJOB_MAX_POSTPONED_COUNTforseal-controller. -
If you have customized
LOUNGE_TTLforseal-dispatcher, set the same value withJOB_RETRY_DELAYforseal-controller.
Caution - known bug
With version 5.3.0, PRINT_ERROR_SHEET does not work.